在上一篇文章(《CAS 在 Authing 控制台配置 认证(二)》)中,我们讲述了如何在 Authing 平台配置项目集成中需要的 CAS 的配置,以及在后期开发过程中如何获取配置。同时,也提前让大家预习和熟悉了一些项目搭建和编码过程中需要的知识点。
接下来这一小节,就让我们一起来顺利完成项目搭建和编码过程吧。
01
项目搭建
使用 Spring Initializr 快速构建项目
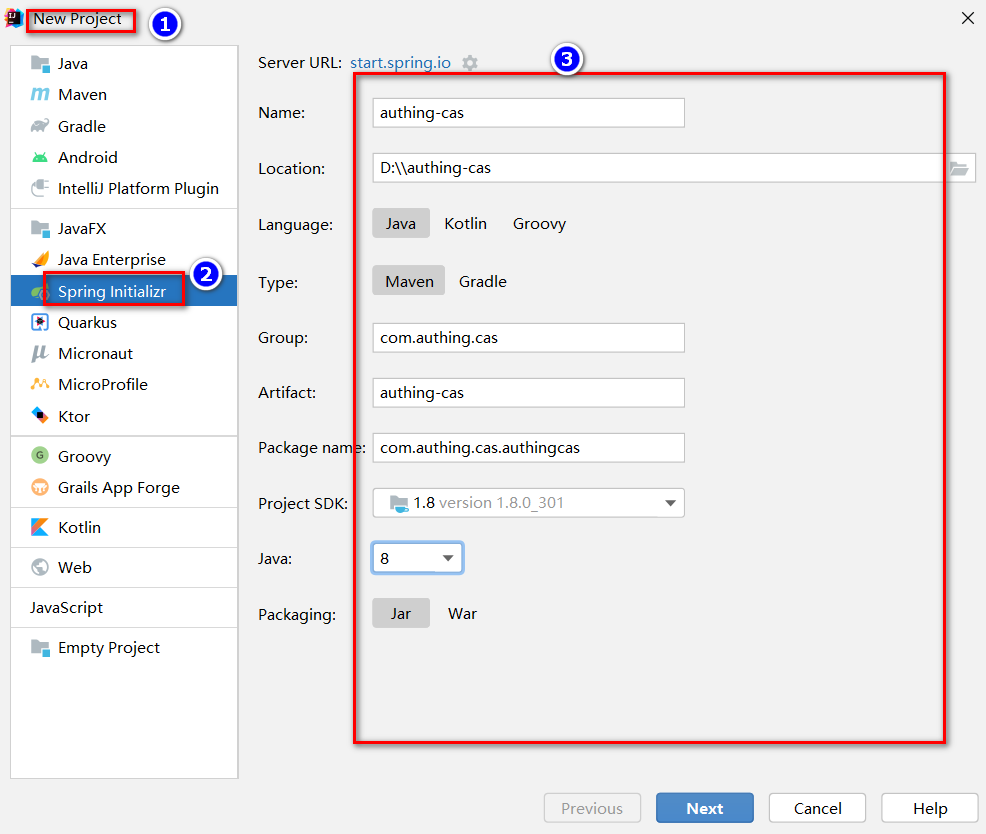
打开 IDEA,点击 New Project 创建一个新项目,选择 Spring Initializr 创建一个 Spring Boot 项目,输入项目的 Group 以及 Artifact 信息。
集成过程中需要在 pom.xml 中添加一些其他的依赖包,如下:
<dependencies>
        <dependency>
            <groupId>org.springframework.boot</groupId>
            <artifactId>spring-boot-starter-web</artifactId>
        </dependency>
        <dependency>
            <groupId>org.springframework.boot</groupId>
            <artifactId>spring-boot-starter-tomcat</artifactId>
        </dependency>

        <dependency>
            <groupId>net.unicon.cas</groupId>
            <artifactId>cas-client-autoconfig-support</artifactId>
            <version>2.3.0-GA</version>
        </dependency>

        <!--远程调用接口使用-->
        <dependency>
            <groupId>cn.hutool</groupId>
            <artifactId>hutool-all</artifactId>
            <version>5.7.11</version>
        </dependency>
</dependencies>项目编码
package com.authing.cas.authingcas.controller;
import cn.hutool.http.HttpUtil;
import org.springframework.http.MediaType;
import org.springframework.stereotype.Controller;
import org.springframework.web.bind.annotation.GetMapping;
import org.springframework.web.bind.annotation.ResponseBody;
import java.util.HashMap;

@Controller
public class CallbackController {

    @GetMapping(value = "/", produces = MediaType.APPLICATION_XML_VALUE)
    @ResponseBody
    public String getTicket(String ticket) {
        HashMap<String, Object> paramMap = new HashMap<>();
        paramMap.put("service", "http://localhost:9999/");
        paramMap.put("ticket", ticket);
        String result = HttpUtil.get("https://cjtjls-demo.authing.cn/cas-idp/61319680ea8b30c9ca9ca071/serviceValidate", paramMap);
        return result;
    }

}http://localhost:9999,即可看到 Authing 登录窗口。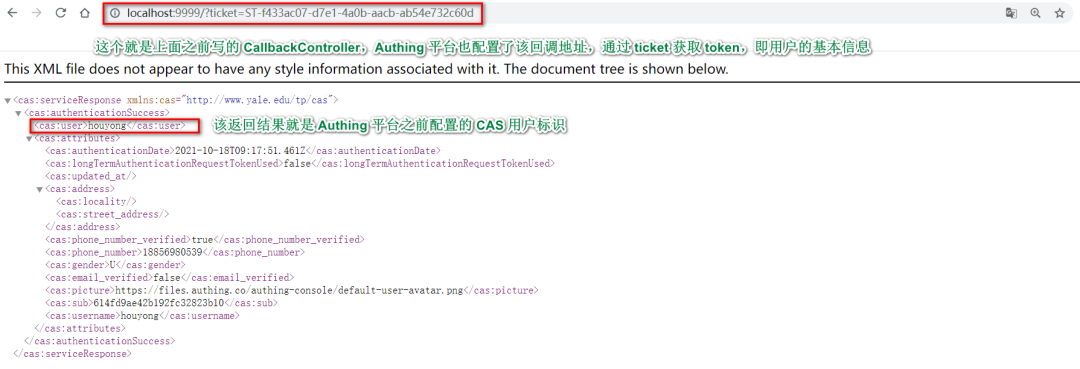
<cas:serviceResponse xmlns:cas="http://www.yale.edu/tp/cas">
  <cas:authenticationSuccess>
    <cas:user>用户名</cas:user>
    <cas:attributes>
      <cas:authenticationDate>2021-07-20T10:04:14.044Z</cas:authenticationDate>
      <cas:longTermAuthenticationRequestTokenUsed>false</cas:longTermAuthenticationRequestTokenUsed>
      <cas:updated_at/>
      <cas:address>
        <cas:locality/>
        <cas:street_address/>
      </cas:address>
      <cas:phone_number_verified>false</cas:phone_number_verified>
      <cas:gender>U</cas:gender>
      <cas:email_verified>false</cas:email_verified>
      <cas:picture>https://files.authing.co/authing-console/default-user-avatar.png</cas:picture>
      <cas:sub>60a5e57cfaa50e4850dd12b0</cas:sub>
    </cas:attributes>
  </cas:authenticationSuccess>
</cas:serviceResponse>
<cas:serviceResponse xmlns:cas="http://www.yale.edu/tp/cas">
  <cas:authenticationFailure code="INVALID_TICKET">Ticket 不存在</cas:authenticationFailure>
</cas:serviceResponse>
项目地址
https://github.com/Authing/example-spring-boot-cas
总结
恭喜 🎉,到此你已经学会了 Spring Security 5 集成 Authing CAS 认证授权的整个流程。后续还有更多的干货,持续关注吧!